Recently I started working on a project which is using GIT as it’s repository for version controlling. Previously I worked with SVN, CVS but not yet got a chance to work with GIT and was really excited to work with it. But later on I came to know that most of the operations done in GIT are done using commands which most of the window users not found very convenient and so I am.
Anyways, I found a window based utility called GIT GUI for basic operation with GIT repository like download contents from GIT repository, Get latest version, commit your changes to repository etc. I faced some problem in using it with available help for basic operation and concluded something to make its use simple.
So Today, I am sharing steps in very simple way for basic operation with GIT GUI These steps might be really helpful to you guys if you are just starting working with GIT.
To access GIT repository we needs following mandatory things.
2. GIT based repository root location
3. Credentials to access GIT repository
Assuming you have already downloaded and installed GIT - GUI on your windows machine. Now we are going to discuss following basic operations.
1. Clone Repository - This operation creates a clone of actual repository (Actual repository resides on remote server) on your local machine. This clone on your local machine will be your working copy. Below are the steps to create clone of a repository.
For Ex - Assume we have GIT repository as below to work with
Step 1 - Right click in a directory where you want to download contents from GIT repository and select Git GUI here from context menu.

Step 2 - Click on Clone Existing Repository link

Step 3 - Enter remote repository location in source
Enter path of directory in target to create local copy of repository on your machine and click on “Clone” button.

It will download content of repository in specified path on your local machine. Now you are ready to work with content code or anything.
2. Pull latest changes - Pull operation is used to get latest changes from remote repository to your local repository or you can say that pull command is used to sync your local repository with remote repository. Steps are given below.
Step 1 - Right click directory where you created your local repository using Clone operation and select Git GUI here from context menu. GIT GUI will be open and pointing to your local repository as below. This window has various option to perform various operation with GIT repository but we are just going to cover most basic operations that are needed at beginner level.

Step 2 - Select Remote --> Fetch from --> origin
This will fetch (pull) all latest changes from remote repository to your local repository from head/root level, that means all latest changes committed in repository will be in your local repository as well now.

Note:- There is also option to pull specif changes as well if you don’t want to refresh complete copy for any reason.
3. Commit Changes to local repository : - Once we have created our local repository and taken latest changes than we are ready to add or modify files in repository. Assuming you have made some changes in main.txt file as available in your local repository. Below are the steps to scan your modified files and commit them in your local repository.
Step 1 - Select your local repository folder and right click and select Git GUI here. This will open GIT GUI utility.

Step 2 - All modified files will appear in left upper box (titled with “Unstaged changes”). You can Rescan for modified files if GUI was not already open and not showing your modified files. Tool will show you contents of selected filed in right upper box and displays your modification in content with green (for addition) and red (for deletion).
Step 3 - Select specific file which you want to commit in repository and click on file icon in left of file name from “Unstaged changes” box. This will move your file to lower left box (titled with “Staged Changes (Will Commit)” )
Step 4 - Enter commit message in right lower box for this specific commit and click on “Commit” button. This will commit your changes to local repository.

Note:- There is option available to add specific line to commit from specific file through selecting file in unstaged box and content will appear in right upper box. Now select specific line and right click, context menu option will appear to stage changes and unstage changes. All staged changes will commit to your local repository.
4. Push changes to remote repository:- Now after commit what else? Here comes the twist in case of GIT repository. As we have created a clone of repository and that is on our local machine only. So this local repository is maintaining version only for our changes to not to lost your changes. But these changes are still not uploaded to remote repository.
There is Push operation which is used to push your committed changes to remote. repository. Below are the steps to push changes to remote location.
Step 1:- Click on “Push” button which will open “Push” window and titled with “Push Branches”
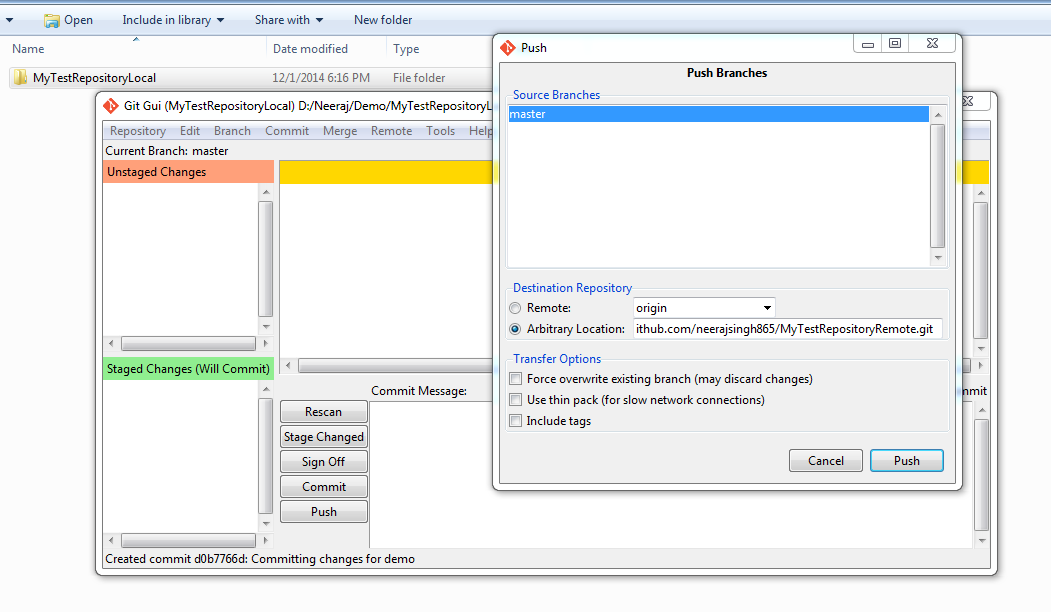
Step 2:- Select master in source branches and enter your remote GIT repository location (As used earlier during cloning of repository) in Arbitrary Location text box. Various options available but not select any check box for now and click on “Push” button. Screen shown above.
Step 3:- Provide the credentials (Username/Password) for repository and click on OK button.

Success screen will appear if your changes successfully pushed to remote repository.

Important points
1. Keep backup of your changes initially for few days until you got confident with the tool.
2. Always get latest changes from remote repository before pushing your changes to it
3. Avoid committing complete branch until you are sure to commit
4. If there is any conflict in file while you taking latest changes resolve them first and commit changes to you local repository and then push your repository changes to remote repository.
Now you are good to go with very basic operations to play with GIT repository. There is lots of other options available in GIT GUI utility that you can explore further.
A good article for further detailed operations with GIT GUI is here to explore more. Till than keep exploring.
No comments:
Post a Comment